
How to embed a Flash video player in Blackboard Contents Jeroen Leijen
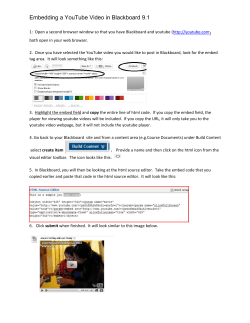
How to embed a Flash video player in
Blackboard
Jeroen Leijen∗
Faculty of Law
Leiden University
revised version April 21, 2009
Contents
Overview
2
Preparation
2
Edit your Blackboard course
4
Variations
7
Alternative approach
8
Blackboard 9.0
9
MP3
∗
10
[email protected], http://jeroen.leijen.net
1
Overview
Support for video files in Blackboard is, to put it mildly, not very strong.
You can attach a file to a content item and use the option ’Display media
file within the page’. But this option is apparently aimed exclusively at
Windows Media files and has known limitations and problems1 .
This document shows how to embed the LongTail JW FLV Media Player in
your Blackboard course. Experience multimedia playback in your Blackboard course as you have never seen it before. Embedding this Flash video
player takes a few simple steps in the content area of your Blackboard
course: upload the Flash video player, upload the video file you want to
show, upload the preview image and write some HTML code. These steps
are explained in detail below. Example HTML is also given. You can use
that as a template for your own courses. But if you prefer, you can use the
setup wizard on the LongTail website to create your HTML.
You learn how to attach your video files outside Blackboard and use the
Flash video player to play them in your course. A second alternative method
to embed the player is presented. The alternative approach uses the ’Unpackage this file’ option to play a video that you packed in a ZIP file.
The JW FLV Media Player plays MP3 audio files as well. So you can use it
for example to embed podcasts in your Blackboard course. This document
focuses on video but a small example for an embedded MP3 is given as
well.
This how-to was written for Blackboard Learning SystemTM 7.2 and JW
FLV Media Player 3-14. A first quick run in March 2009 on our Blackboard
test server learned that this method also works with Blackboard 9.0.
Feel free to contact the author if you have any questions or suggestions for
improvement regarding this document.
Preparation
Get the Flash media player, prepare your video and make a preview image.
1. Get the JW FLV Media Player You can download the latest version from
the LongTail Video website: http://www.longtailvideo.com/
players/jw-flv-player/. Unzip the downloaded ZIP file somewhere on your computer. Remember where you put the files. Make
sure you obtain a licence if necessary. For more information about the
1
For example André Rosendaal, 2009 (in Dutch): http://blackboardusergroup.
weblog.leidenuniv.nl/2009/04/20/streaming-media-en-blackboard
2
licence policy see https://www.longtailvideo.com/players/
order2.
2. Prepare your video file Select the video file you want to embed. Make
sure the format of your video is compatible with the JW Player. Any
’FLV’ encoded video should work. The current release of the JW
Player also plays H264 MP4 videos. Make a note of the height en
width of your video file. If you don’t know these values you can find
them by opening the Stream and Media Info window when you play
your video in the excellent VLC media player.
3. Create a preview image (optional) The preview image is shown as a background image in the video player when the player is idle. Make sure
the preview image has the same dimensions as your video file. The
preview image can be any image you like. It gives a nice effect when
you use a screen shot of your video file.
3
Edit your Blackboard course
Create a folder in a content area, upload the files and embed the player.
1. Create a new folder In your Blackboard course create a folder somewhere
in a content area. In this example I created the folder ’Videos’ in the
content area ’Documents&Sheets’. Of course you can use any name
you like.
2. Create new item and upload the media player application Enter the folder
you created in step 1. Create a new item, give it a name and choose
attach local file. Click ’Browse’ to select the file to attach. Select the
file ’mediaplayer.swf’ (you can find it where you unzipped the downloaded JW FLV Media Player ZIP file, see under the section preparation). Make sure you select "Special Action: create a link to this file".
Click Submit and OK. In this example I set the item name to ’Genova’.
3. Upload your video file Attach another local file to the item you created
in step 2. Click on the modify button to append a file to an item. See
picture below. In this example I uploaded the video file ’genova.flv’.
Don’t forget to select "Special Action: create a link to this file".
4. Upload the preview image (optional) The same action for the preview
image. In this example I uploaded the picture ’preview-image.jpg’.
5. Find and modify links This step is important. Find the internal Blackboard links to the uploaded files and copy and paste them into an
empty document. You can find the links by clicking the right mouse
button on the hyperlinks to the attached files Blackboard created within
the item you created and choose ’Copy Link Location’ (Firefox) or
’Copy Shortcut’ (Internet Explorer).
4
You’ll have to modify these links in order to get things working. This
needs some explanation. The link Blackboard creates when you attach a file to an item and select "Special Action: create a link to this
file" is not permanent! The link changes overnight. So you can’t use it
to make a hyperlink reference in any HTML you want to put in your
item. Luckily there is a way to avoid this problem. The internal links
to attached files as created by Blackboard contain characters like this:
@@0B99C68D1BFDE15408BDF1710FFA70A0/. These characters are the
part of the link that changes overnight. You simply have to cut out
this part to make your link permanent.
Example. Say the internal link to your video file looks like this:
http://blackboardserver.com/+
@@0B99C68D1BFDE15408BDF1710FFA70A0/courses/1/+
testcourse/content/_549172_1/video.flv
To make this link permanent you have to change it into:
http://blackboardserver.com/courses/1/testcourse/+
content/_549172_1/video.flv
To continue our tutorial, modify the links to the files you attached as
explained here.
If you don’t like the idea to modify the links or you think it’s too much
work you can consider to use the alternative approach for embedding
a video player. See the section ’Alternative approach’.
5
6. Embed the media player You have to write some HTML code to do this.
You can use the template below. Paste the HTML into the text box of
the content information of your item. Make sure you set the Content
Information type to ’HTML’. Or if you use the Visual Text Box Editor
click on the Toggle HTML Source Mode button. I recommend to disable the Visual Text Editor as I have experienced disappearing tags
when editing HTML with it.
HTML template:
<p>Description of your video</p>
<div class="previewDiv" style="WIDTH: 320px; HEIGHT: +
260px">
<embed src="mediaplayer-url" width="320" height="260"+
type="application/x-shockwave-flash" +
allowscriptaccess="always" allowfullscreen="true" +
flashvars="width=320&height=260&file=videofile-url&+
image=previewimage-url" /> </div>
- Replace the string ’mediaplayer-url’ in the template with your modified mediaplayer.swf link.
- Replace the string ’videofile-url’ in the template with your modified video file link.
- Replace the string ’previewimage-url’ in the template with your
modified preview image link.
- Replace the values for ’height’ and ’width’ in the template with the
dimensions of your video file. Important: you have to add 20 to the
height to accommodate the player’s control-bar. If the dimensions
of your video are 320x240 you must give 260 for the height.
Full example:
<p>Description of your video</p>
<div class="previewDiv" style="WIDTH: 320px; HEIGHT: +
260px">
<embed src="http://blackboardserver.com/courses/1/+
B2002/content/_762674_1/mediaplayer.swf" width="320" +
height="260" type="application/x-shockwave-flash" +
allowscriptaccess="always" allowfullscreen="true" +
flashvars="width=320&height=260&file=http://+
blackboardserver.com/courses/1/B2006/content/+
_1046255_1/genova.flv&image=http://blackboardserver.+
com/courses/1/B2006/content/_1046255_1/preview-image.+
jpg" /> </div>
6
The HTML you created should look similar. Paste it into the text box
of the content information of your item. Save your item: Submit and
OK.
Note. Instead of manually editing the HTML as shown above you
can use the setup wizard on the LongTail website. Open the wizard at
http://www.longtailvideo.com/support/jw-player-setup-wizard
In the setup wizard fill in the appropriate values under ’Tweak the
available flashvars’. For ’source’, ’file’ and ’image’ use the hyperlinks
to the items you uploaded in step 2-4. Make sure you use the modified links. Height and width refer to the dimensions of your video
file. The same here to accommodate the control-bar: add 20 to the
height.
After entering all the values click ’Update preview&code’. Now you
can copy the rendered code from the setup wizard to use it in your
item. The setup wizard allows you to modify all the JW Player’s parameters. You can experiment with different settings.
7. Done. Play your video!
Variations
Variation 1: attach files inside a separate folder
When you attach a file to an item in Blackboard and select "Special Action:
create a link to this file" this link is added automatically to the content information text of your item as a click-able hyperlink. If you don’t like that
you can use the following workaround. Create an extra folder in your content area and use this folder to hold the items with the attached files. Link
to these files from your item that contains the HTML required to embed the
player. Simply find and modify the links as explained in step 5 above.
7
Variation 2: attach files outside Blackboard
It is not necessary to store the media player inside Blackboard. You can
put it anywhere on-line. This is especially useful if you want to embed
several videos in your Blackboard course. Instead of having to upload a
mediaplayer.swf file for each video item you want to show you can use
one link that points to a location outside Blackboard where you put the
mediaplayer.swf file. Just make sure to change the HTML code accordingly.
Also verify that your students actually have access to the location where
you stored the player. As you might have guessed you can also store your
video and preview files outside Blackboard.
Alternative approach
Instead of "Special Action: create a link to this file" you can also use "Special
Action: unpackage this file" to embed the video player. You have to prepare
a ZIP file that contains the video player application, the media files and a
HTML file similar to the template shown in step 6 with relative links to the
player and the media files. Attach this ZIP file to your item in the content
area and choose "Unpackage this file" from the Special Action pulldown.
Click on Submit. Then in the next screen ’Content Actions’ select the HTML
file as the Entry Point and click Submit and OK.
There is only one file to attach with this method. Moreover you don’t have
to modify the internal links that Blackboard generates. But there is a drawback. Students don’t immediately see the video player when they enter the
content area. There is only a link to the ZIP file. They have to click on that
link to see the player.
8
A comparison of the appearance of both methods:
Blackboard 9.0
Blackboard 9.0 recently got released. A quick run on our test server proved
that the method described in this document can be used on 9.0 as well. The
internal link structure in 9.0 is different though. So make sure to apply the
following modification to any of the internal links to attached files if you
want to refer to them in the HTML code in your content area.
Original link to the attached video file:
https://testing.blackboardserver.com/webapps/blackboard/+
content/contentWrapper.jsp?attachment=true&content_id=+
_982073_1&displayName=Audio+%26+Video&course_id=_53715_1&+
href=/%40%40/9A9412FDB0D4DBB7E76A4F7234BFA294/courses/1/+
TestcourseLAW-0000LAW/content/_982073_1/sector_3okt08.flv
Modified permanent link:
https://testing.blackboardserver.com/courses/1/+
TestcourseLAW-0000LAW/content/_982073_1/sector_3okt08.flv
As you can see the part that starts with ’contentWrapper’ and ends with
the large hexadecimal number has to be removed from the link:
9
contentWrapper.jsp?attachment=true&content_id=_982073_1&+
displayName=Audio+%26+Video&course_id=_53715_1&href+
=/%40%40/9A9412FDB0D4DBB7E76A4F7234BFA294/
MP3
The work-flow to embed an MP3 audio file is more or less the same as for
video files. You can follow the steps above. More detailed instructions can
be found on the LongTail Video website. The HTML code to paste in your
content area item should look something like this.
<p>Describe your MP3 file here</p>
<div class="previewDiv" style="width: 470px; height: 70px+
;">
<embed src="mediaplayer-url" width="470" height="70" type+
="application/x-shockwave-flash" allowfullscreen="true" +
allowscriptaccess="always" flashvars="height=70&width=470&+
file=mp3file-url" />
</div>
Replace the string ’mediaplayer-url’ above with the link to the location
where you put the mediaplayer.swf file. Don’t forget to modify the link
if it is location inside your Blackboard course.
Replace the string ’mp3file-url’ above with the link to the location where
you put your MP3 file. Don’t forget to modify the link if it is location inside
your Blackboard course.
10


© Copyright 2026