
How to use Dropbox for MyNetball
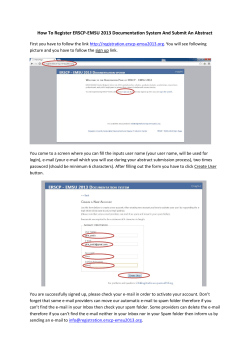
How to use Dropbox for MyNetball
You can increase your website data by using an online storage program such as Dropbox. This
program will store your forms and images and allow you to share the link via your website. This will
not affect your data capacity. You can either link people to each
individual file or link to specific folders within Dropbox
Step 1 – Create Account
-
Visit www.dropbox.com
Click the Sign In tab at top of screen and create a
new account
Complete your details
Step 2a – Upload Files Individually
*** TIP – remove spaces in filenames, eg “Doc 2012.doc” becomes “Doc2012.doc” to ensure compatibilty
-
Go to the Dropbox home page (click on the Dropbox logo in the top left corner)
Click on the upload icon at the top of the page to upload your file
Choose the file you want to upload and click open
The file will begin to upload automatically
Once it has completed uploading, click done and the file will then appear in your
Dropbox menu
Hover over the Share link button found to the right hand side of the file name and
click
This will open another webpage, close the front window which asks you to add
emails and copy the web address at the top of the page
You are then ready to use your uploaded file in MyNetball
Step 2b – Upload Files to a Specific Folder
-
To create a specific folder to upload files to simply click on the new folder button at the top
of the page
-
Give your folder a heading eg rep forms or competition forms
-
Once created and named, click on the folder
-
Once you are in the folder go click on the upload icon at the top of the page to upload
your file
-
Choose the file you want to upload and click open
-
The file will begin to upload automatically
-
Once it has completed uploading, click done and the file will then appear in the folder
-
Repeat until all of the files you wish to upload have been completed
-
Hover over the Share link button found at the top right hand side of page and click
This will open another webpage, close the front window which asks you to add
emails and copy the web address at the top of the page
You are then ready to use your uploaded folder in MyNetball
-
Step 3 – Add to MyNetball
-
-
-
Sign into MyNetball (you will first need to have filled out a user agreement form
which can be located on the Netball Queensland
website)
Click on the website menu mode at the top right
hand side of the screen
There are two options for you to insert the link to
your website. You can either put the link onto a
webpage or have the link as a menu item
Creating a page:
o To create a new webpage, you will need to
click on ‘General Pages’ under the content
menu
o Click on ‘Go’ to create a new blank page
o When the page loads, you will be able to give your page a heading and add
the content you wish to publish on this page.
To add the link to Dropbox you can either directly copy and paste the link or use the hyperlink
button
-
Adding the link to a menu item:
o Click on ‘Edit Menu’ under the Site menu
o Once here, you can add a new menu item by clicking on ‘create a child’. Note that
clicking on ‘create a child’ next to
‘root’ will create a main menu item.
If you want to create a sub menu
item, click on ‘create a child’ under
the relevant heading.
o Once you have created your heading
you will need to set up the ‘Item
Target’. You can either set this to be
an existing page that you have
created (html page) or a link to a website such as your Dropbox link by clicking on
‘External’ (see below)
-
Once completed click on ‘Publish Menu’
** Helpful Hints
- Instead of having numerous pages you are able to create one extra page with numerous links. For
Example: You can have a Photos secondary menu item which can include links to photo albums/files
from your Dropbox.


© Copyright 2026