
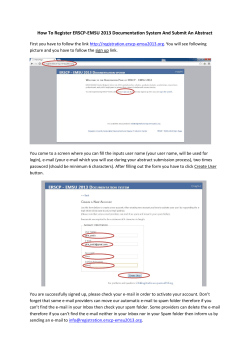
The purpose of this simulation is to show you where... 1. A login page will be displayed.
How to Place a DFA Request?
The purpose of this simulation is to show you where and how to place a DFA request.
1. ENTER the link http://dfx.dmn.flextronics.com/index.htm in the address bar.
A login page will be displayed.
2. ENTER the Windows User Name and Password.
If this is your first time logging in, the system will take you to the “Register Window”. The dropdown selections throughout this simulation are for demonstration purpose only. When going
through the actual registration process, you should select your individual attributes.
3. CLICK the Requestor’s site dropdown and select your site.
4. CLICK the Requestor’s Segment dropdown and select your segment.
5. CLICK Submit.
A “Submit” was done successfully message will be displayed.
6. CLICK OK.
7. CLICK the New Request tab.
8. CLICK the Site dropdown and select Requestor’s site.
9. CLICK Project Name dropdown and select your project, or CLICK the New button if your
project name isn’t listed.
10. Then type your project name into the dialog box to add it to the list. ENTER the MEP Code: If
you don't know this information, ask the Project Manager.
11. CLICK the Customer dropdown and select the customer name the project belongs to.
12. SELECT the Expedite checkbox if there is an urgent need to complete the analysis.
13. SELECT 30% Improved L/T or 50% Urgency from the dropdown according to your urgent
status.
14. SELECT the Completion Date.
15. ENTER the Production volume according to project forecast.
16. SELECT current project stage from the FPLC Stage dropdown.
17. ENTER the DFA Analysis and any information the DFA engineer needs to know in the
Description box.
18. CLICK the Add button.
An Upload file webpage dialog box will be displayed.
19. SELECT DFA (Design for Assembly) in the Category dropdown menu.
1|Pa g e
20. TYPE document description such as Mechanical BOM, 3D data etc. in the Description
box.
21. CLICK the Browse button.
A Choose File to Upload dialog box will be displayed.
22. SELECT the document you need to upload.
23. CLICK Open.
24. CLICK Upload.
25. CLICK the Add button and repeat these steps to upload additional documents.
An Upload file webpage dialog box appears.
A Choose File to Upload, dialog box will be displayed. You need to upload a file to be able to click
the submit button.
26. CLICK Submit.
A “Submit” was done successfully message will be displayed.
2|Pa g e


© Copyright 2026